Port forwarding
This page contains information on how to expose containers to an external network by using Port forwarding.
Port Forwarding feature
Container Desktop provides a feature to expose containers on a specific network. By default, containers are only accessible on localhost. With the Port forwarding feature you can bind the container ports to a specific network interface. This allows other machines on the same network to access the containers. As a user you need to configure the firewall to allow inbound traffic to the containers.
Example Scenario
In this example scenario we are going to publish an nxing container on HTTP/80 on an external network interface. The example scenario contains the following steps
- Run nginx container on Port 80
- Enable Port forwarding in COntainer Desktop
- Configure the Windows Firewall
Run nginx container on port 80
First, we run an nginx container with the -p argument to publish it on port 80:
docker run -p 80:80 -d nginx
Note: The first part of the value for the
-pargument is the port on the host. The second part after the:is the port on the container. When you get an error telling you the port is in use, you’ll have to pick a different port for the host.
Open your browser and open http://localhost, the default “Welcome to nginx!” page should be shown. Make sure to use the port you’ve bound to the container.
Enable Port Forwarding
Now we can publish the running containers on the network interface of our choise. Select the Port forwarding_ option in the Container Desktop system tray application, and select the network interface that you want to forward the ports of your containers to:
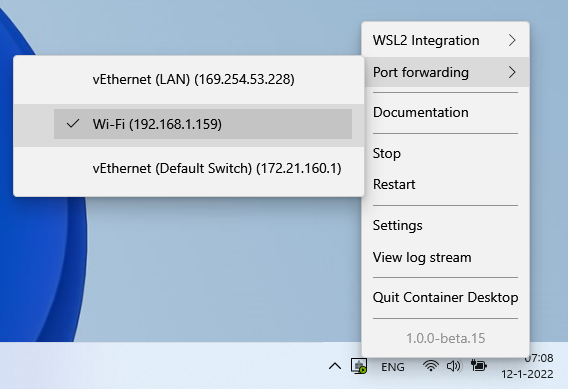
Container Desktop binds the adapter to listen to the container ports that are published.
Note: all published ports are exposed on the chosen network interface. Make sure you’re aware of what containers you’re exposing to your external network interface.
Configure firewall
To allow external connections we need to open the firewall to accept inbound traffic on the used ports.
- Open PowerShell with administrator privileges
- Create a new Firewall inbound rule to accept inbound traffic on port 80
New-NetFirewallRule -DisplayName "Container-Desktop-Example" -Direction Inbound -Profile Private -Protocol TCP -LocalPort 80Note: In this example the firewall profile “Private” is used. Depending on the connected network you may need to specify a different profile (Domain/Public).
Open a browser on a different machine that is connected to the same network and open http://<external ip adress>, the default “Welcome to nginx!” page should be shown.
Clean-up
After fowllowing the example configuration, please remove the the example configuration
Remove Firewall configuration:
- Open PowerShell with administrator privileges
- Remove the Container-Desktop-Example firewall rule
Remove-NetFirewallRule -DisplayName "Container-Desktop-Example"
Disable Port Forwarding
Disable the port fowarding option in container desktop by deselecting the interface in the Port forwarding option of the Container Desktop system tray application.